
Creating & organizing projects
Everything you do in Paddock lives inside a project. This guide is the practical, do-it-now companion to the Projects concept: that page explains what a project is; this one walks through how to create one, organize a growing collection, and tune it to your taste.
By the end you’ll know how to create both kinds of project, sort them into areas, set per-project metadata and keeper behaviour, and rescue a one-off scratch chat by promoting it into a real project.
Create a new project
Section titled “Create a new project”Click New Project — the button is in the left sidebar, and again on the projects home page (top-right, and in the empty state when you have none yet). That opens the New project dialog:
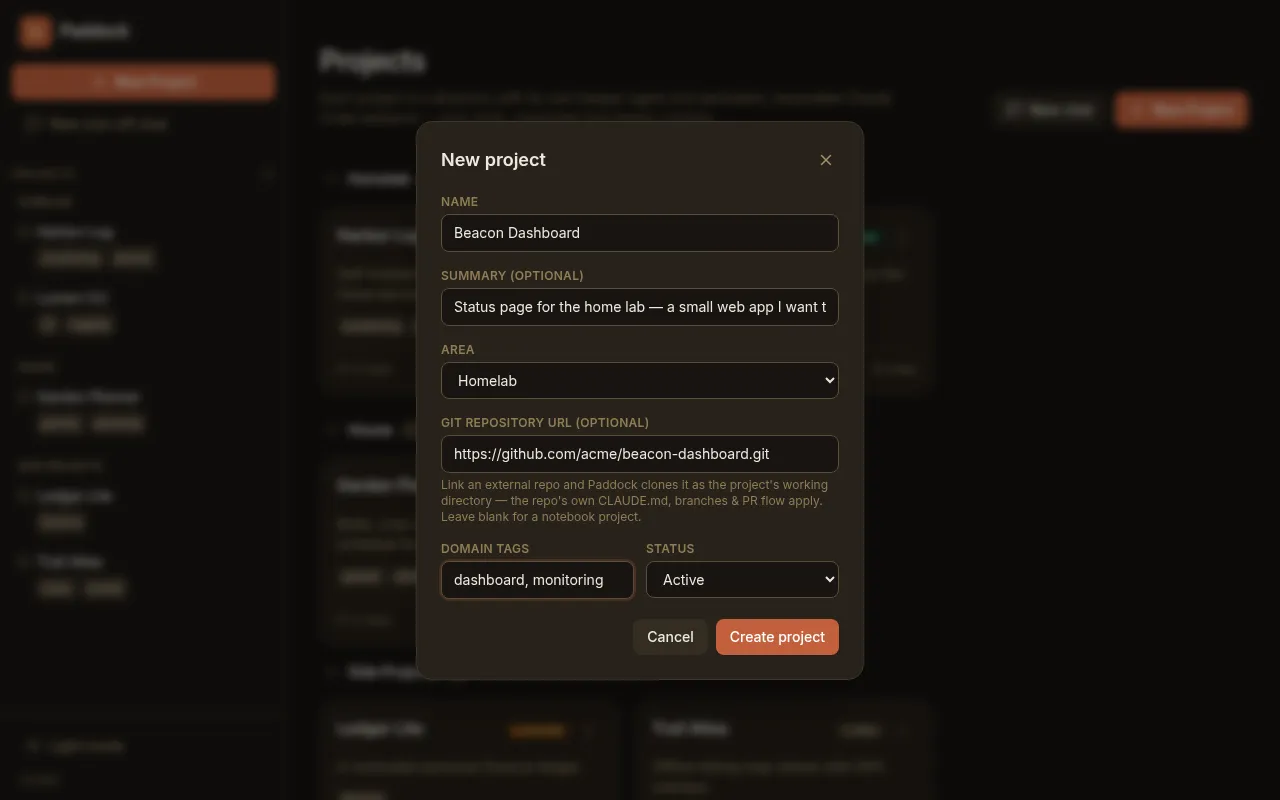
You only have to fill in one field — everything else has a sensible default:
- Name (required) — a human title, e.g.
Garden Planner. Paddock derives the on-disk slug from it automatically (Garden Planner→garden-planner), so you never type a slug. - Summary (optional) — one line on what the project is about.
- Area — the single group this project belongs to (see Organize projects into areas). Defaults to Unsorted; you can move it later.
- Git repository URL (optional) — leave it blank for a notebook project; paste a repo URL to make it repo-backed (next section).
- Domain tags — comma-separated, cross-cutting labels like
garden, planning. Unlike the area, a project can carry many tags. - Status — defaults to active. Pick
ideafor something you’re still mulling.
Click Create project and you’re dropped straight into the project’s first chat, ready to start working.
Choose the project type: notebook vs repo-backed
Section titled “Choose the project type: notebook vs repo-backed”The single choice that matters at creation time is whether you fill in the Git repository URL field. It’s what splits the two project types, and it’s immutable once the project exists — so it’s worth getting right.
Notebook — for notes, plans, and ops
Section titled “Notebook — for notes, plans, and ops”Leave the git field blank. The project directory itself becomes the keeper’s
working directory, and Paddock seeds it with a starter CLAUDE.md. This is the
right choice for research, planning, home-lab runbooks, or anything that isn’t
itself a code repository. The keeper works with Markdown notes, docs, and its
chat history — all curated inside Paddock.
Repo-backed — for a codebase you want the keeper to build
Section titled “Repo-backed — for a codebase you want the keeper to build”Paste an external git URL and Paddock clones that repo into a checkout inside
the project, then points the keeper’s working directory at the clone. HTTPS,
SSH (git@host:owner/repo), git://, and local paths all work.
Because the keeper now lives inside a real checkout, the repo’s own CLAUDE.md,
branches, and PR workflow all apply — the keeper can branch, commit, and open
pull requests against the upstream just like you would. Paddock keeps its own
metadata (project.yaml, OVERVIEW.md, CHANGELOG.md, and the chat transcripts)
in the enclosing project directory, safely outside the checkout via a sidecar
.gitignore.
For the full mechanics of dir vs workingDir and why metadata stays outside
the checkout, see the Projects concept page.
What a project.yaml holds
Section titled “What a project.yaml holds”A project is just a directory plus a project.yaml under your data root. You
rarely edit it by hand — the Settings tab
writes it for you — but knowing the shape helps. A fuller example:
# Paddock project metadata. Directory name MUST equal `slug`.# status: idea | active | paused | blocked | done | abandonedname: Garden Plannerslug: garden-plannerstatus: activedomain: - garden - planningvisibility: publicstarted: 2026-07-17updated: 2026-07-17summary: Beds, crop rotation, and a watering schedule for the back garden.group: houseThe fields:
| Field | What it is |
|---|---|
name, slug | Title and its derived directory name. slug is immutable. |
status | idea · active · paused · blocked · done · abandoned. |
visibility | public or private. |
summary | The one-liner shown on the card. |
domain | Cross-cutting tags (many per project). |
group | The project’s area — its single, exclusive home. |
started, updated | Creation date (immutable) and last-touched date (auto-bumped). |
links | Optional {label, url} bookmarks. |
repo | Present only for repo-backed projects; immutable. |
model, permissionMode, driveMode, maxTurns, docker | Per-project keeper overrides — see below. Absent means inherit the box default. |
Paddock writes only the fields it needs: on a freshly created project, keeper overrides you didn’t set are absent from the file and resolve to the box-wide defaults at run time. (Saving the Settings tab changes this for some of them — see the caveat there.)
Organize projects into areas
Section titled “Organize projects into areas”As your collection grows, the projects home page keeps it legible by clustering
cards under their area — the project’s group. An area is simply a
free-form label: the server stores whatever string you give it, so you can
have as many areas as you like and name them anything. To make the common cases
one click, the Area dropdown (in the New Project dialog and in Settings)
comes pre-filled with three ready-made suggestions — Homelab, House, and
Side Projects — plus Unsorted. You are in no way limited to those.
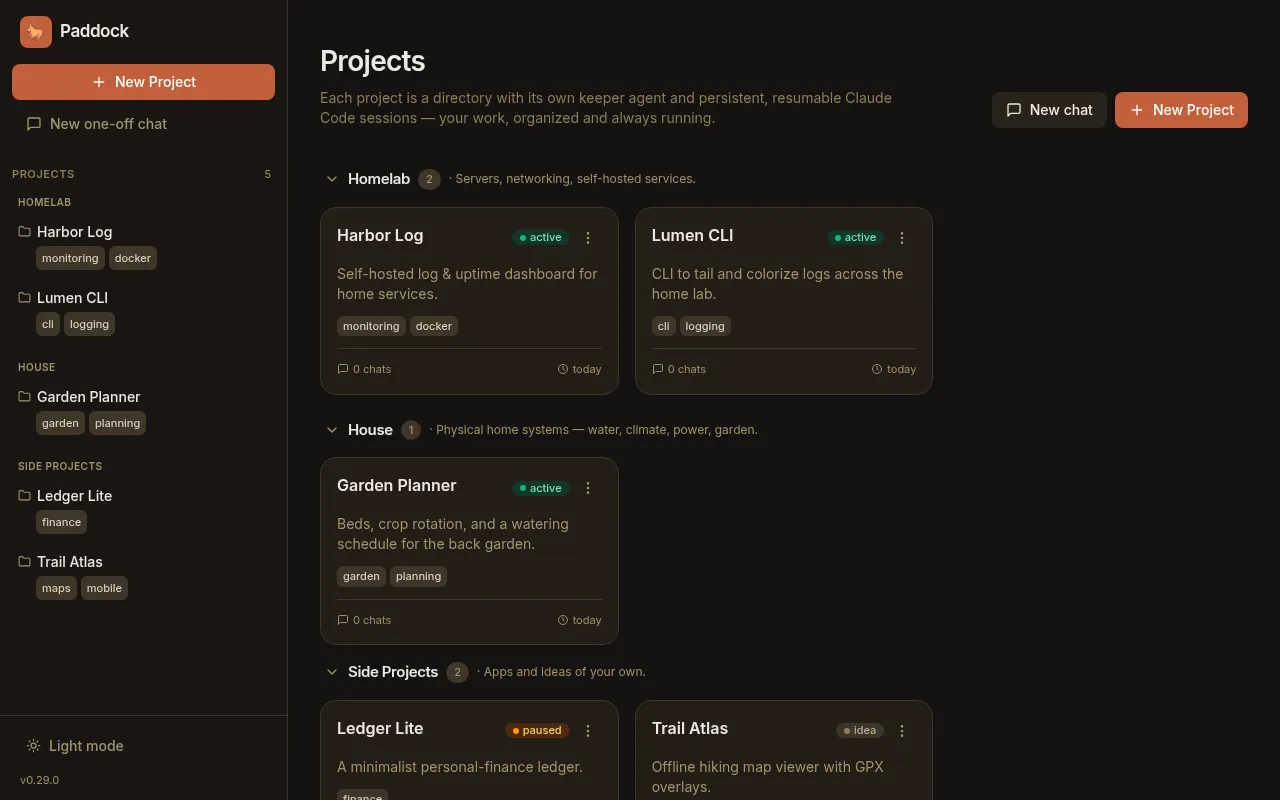
On the home page an area only becomes a section once at least one project uses it — a fresh Paddock with no projects shows no area sections at all. When sections do appear they’re ordered predictably: the three built-in areas first (in the order above), then any custom areas alphabetically, then Unsorted last. Each section is collapsible, with a heading and a project count. Set a project’s area at creation from the Area dropdown, or change it any time from Settings.
Tune the keeper: the Settings tab
Section titled “Tune the keeper: the Settings tab”Open any project and go to its Settings tab (/projects/<slug>/settings) to
edit everything the creation dialog left out, plus how the project’s keeper
agent behaves. Changes are staged and applied with Save changes.
Identity & metadata — Name, Summary, Status, Area, Visibility, Domain tags, and Links, all editable here. (Slug, Started, and Created are shown read-only.)
Keeper agent — the knobs that shape how the agent runs:
- Model — which Claude model the keeper uses. Larger context windows (Opus/Fable/Sonnet: 1M; Haiku: 200K) fit longer chats.
- Permission mode — how much the keeper asks before acting:
- Default (ask each time)
- Accept edits (the default) — applies file edits without asking
- Plan only
- Bypass all (use with care) — runs every tool unprompted; only for sandboxes you trust.
- Drive mode — Batch (one-shot per turn) is the classic path; Session
(cross-turn autonomy) keeps the agent alive across turns so features like
ScheduleWakeupand/loopwork. Leave it on Global default to inherit the box-widePADDOCK_KEEPER_DRIVE_MODE; a Reset to global default button clears an override. - Max turns — an upper bound (1–1000) on agent turns in a single run.
- Docker sandbox — run the keeper inside a Docker container (needs a working Docker daemon on the box).
See Environment variables for the defaults a fresh project starts from.
Preload project context (in the composer, not Settings)
Section titled “Preload project context (in the composer, not Settings)”One keeper-related toggle lives on the chat composer, not the Settings tab:
Preload project context. On the first turn of a new project chat, it
injects the project’s curated OVERVIEW.md + CHANGELOG.md so the keeper starts
already knowing the project’s current state and history. It’s on by default. On a
brand-new project the toggle still appears but is disabled (labelled “no
overview yet”) until the sweeper has written an
OVERVIEW.md — there’s nothing to preload until then.
Promote a scratch chat into a project
Section titled “Promote a scratch chat into a project”Not everything starts as a project. Paddock has one-off (scratch) chats — a quick conversation not tied to anything — for when you just want to think out loud. If one turns out to be worth keeping, don’t copy-paste it: promote it.
From a one-off chat, click Promote to project. Give it a Project name (pre-filled from the chat), and optionally a summary, area, and domain tags:
Paddock then creates a real project and moves the chat’s full history into it — transcript and all — so the conversation stays resumable under the new project’s keeper. Nothing is lost; the scratch chat simply becomes the project’s first chat.
Next steps
Section titled “Next steps”- Projects — the concept behind notebook vs repo-backed, and what a project directory contains.
- Keeper & scratch agents — the agents that do the work in each project.
- The sweeper — how
OVERVIEW.mdandCHANGELOG.mdstay curated (and what “Preload project context” injects). - Environment variables — the box-wide defaults your per-project settings inherit from.